Posted on

How to Remove Controller for Jungheinrich Junior AME13

Here is the instruction show you guide on how to remove and install controller for Jungheinrich Junior AME13 forklift truck.


Jungheinrich JETI Judit-4 v4.37.001

Jungheinrich JETI SH 4.36 Forklift Service Information 2023

Jungheinrich JETI ET 4.37 EPC Updated 492 Spare Parts Catalog


Disassembling the controller

Requirements

Truck parked securely – see operating instructions.


Procedure

Disconnect the battery connector and lift out the battery – see operating instructions.

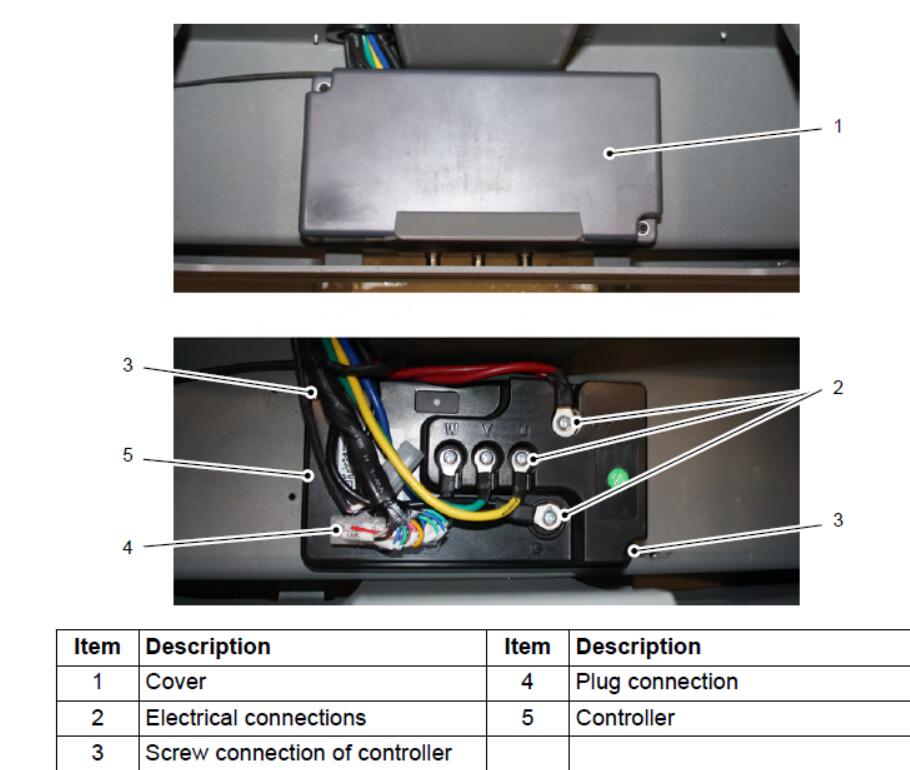
The controller is underneath the battery.

Remove the cover (1) of the controller (5).

Detach the electrical connections U, V, W, B+ and B- (2).

Undo the plug connection (4).

Undo the screw connections on the controller housing (3)

Lift out the controller (5).

Controller removed.


Fitting the controller

Requirements

Truck parked securely – see operating instructions


Procedure

Insert the controller (5).

Fit the controller (5) in place.

Re-establish the plug connection (4).

Connect the electrical connections U, V, W, B+ and B- (2)

Fit the cover (1) of the controller (5).

Insert the battery and connect the battery connector Controller fitted.

A teach-in of the controller is required after replacement. Otherwise, an error is indicated by means of a flashing code (4x long and 3x short).


Controller teach-in

Jack up the truck – see operating instructions.

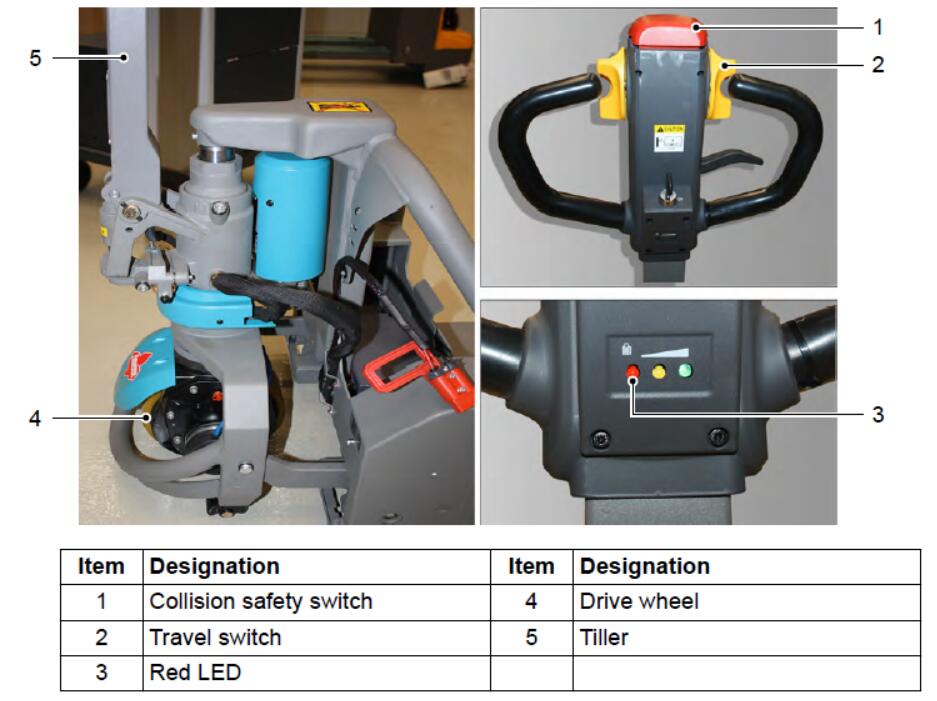
Move the tiller (5) to home position.

Press and hold both the collision safety switch (1) and travel switch (2) for a short time.

The teach-in process starts and takes approx 2 to 2.5 minutes. During this process, the drive wheel (4) rotates in different directions and at different speeds

The teach-in process is finished when the red indicator lamp (3) stops flashing.

Do not interrupt the teach-in process.

Start up the truck and carry out a function check – see operating instructions.

Posted on

Jungheinrich ETM/V 13,5-20 MSEseries Forklift Hoist Frame Tilting Mechanism Checking and Adjusting

This instruction show you guide on how to check and adjust the hoist frame tilting mechanism for Jungheinrich ETM/V 13,5-20 MSE series forklift truck.

Jungheinrich JETI Judit-4 v4.37.001

Jungheinrich JETI SH 4.36 Forklift Service Information 2023

Jungheinrich JETI ET 4.37 EPC Updated 492 Spare Parts Catalog


Checking and adjusting the hoist frame tilting mechanism
1 Checking and adjusting hoist frames equipped with fork tilting systems1.1 lllustration/table of adjusting dimensions

1.2 checking the hoist frame tilt-back
NOTE: Hoist frame tilt-back checking and adjusting operations must be performed without anyload on the fork.
– Place the vehicle on level ground, rotate the drive wheel through 90° andapply the parking brake.
– Move the hoist frame tilting system forward against the stop.
– Attach a plummet to the fork carrier and raise the fork to a height of 1000 mm.
– Let fall a perpendicular from a lifting height of approx.1000 mm and mark the first measuringpoint on the ground.
– Raise the hoist frame together with the plummet to the full lifting height “h?” and lower thefork by 30 mm.Let fall a perpendicular and mark the second measuring point on the ground.- Check that the dimension between the first and second measuring point corresponds with theadjusting dimension “X” (mm) indicated in the table for the lifting height “hg”.
Readjustment of the tilt-back is necessary when the Xmin / max -values indicated in the tableare exceeded!

1.3 Adjusting the hoist frame tilt-back
– Slacken nut (1) of the vibration damper and check nut(3)(left-hand thread) and clampingscrews (2) of the mast blocking device.
– Rotate the middle section (4) of the mast blocking device in the required direction until theadjustment dimension “X” , relating to the lifting height “h,” as indicated in the table, has beenobtained.

NOTE: When looking in the direction of the check nut (3):
– Clockwise rotation of the middle section (4) of the mast blocking device will increase theadjustment dimension “X”
-Anti-clockwise rotation will reduce the adjustment dimension “x”.
– Check nut (3) and clamping screws (2) thighten using the required torque.
– Proceeding as detailed in para.1.1 , raise and lower the hoist frame twice between the first andsecond measuring point, each time checking dimension “X” between the markings on the
ground.
Perform the required corrections, if the Xmin / Xmay values, as indicated in the table, areexceeded.
– Tighten nuts (1 ) of the vibration damper.
Block dimension of the spring packet A = 0mm.