Perform the following procedures in order to determine if a fuel injector does not work correctly.
Bench test the fuel injectors at a temperature of 18° to 20 °C (64° to 70 °F).
What you Need?
Perkins EST 2023A Diagnostic Software
Perkins Communication Adapter 3
Procedures:
1 Run the engine at low idle.
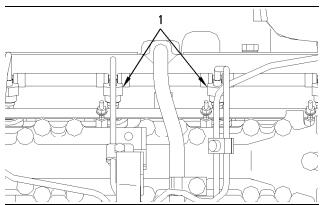
2 Loosen the connection for the high pressure fuel line (1) at the fuel injector on No. 1 cylinder. Do not loosen the nut more than half of a turn. Listen for the low idle to decrease or become rough. Tighten the nut for the fuel supply line on No. 1 cylinder.
Perform this test on each cylinder.
3The fuel injector is faulty when the nut for the fuel supply line is loosened and the following events occur:
• The engine rpm does not decrease.
• The engine does not idle roughly.
4 Remove the fuel injector for additional testing.
Note: If leakage occurs at the nut for the fuel supply line, make sure that the fuel supply line and the nut are correctly aligned with the inlet connection of fuel injector. Do not tighten the nut for the fuel supply line on the high pressure fuel line more than the recommended torque. If the nut is tightened more, the fuel line may become restricted or the threads of the fuel injector and the nut may be damaged.
Cleaning of the fuel injectors
Before a fuel injector is tested, remove any loose carbon from the tip of the fuel injector. Do not use abrasive material or a wire brush in order to clean the nozzle.
The fuel injector is not a serviceable part.
Disassembling or adjusting the nozzle will violate the standards for emissions.
Note: Extra care should be used in handling the fuel injector in order to prevent damage to the nozzle tip.
A scratch or a burr could cause needle leakage or spray distortion. Dirt in the orifices of the nozzle tip can damage engine components. Dirt can also distort the spray pattern of the nozzle.

